Load testing a machine learning model
1. Introduction
In the last couple of years, I have seen a shift in the data science content that had been published on the web from more introductory content, like how algorithms works, model training, validation process, to one about how models behave in the real world. When I have thought about machine learning in production some disciplines come to mind, like continuous integration, deployment strategies, monitoring, and performance, for instance.
Nowadays one bright new field is growing called machine learning operations (MLOps) that aim to group a set of best practices from DevOps culture to better deploy and maintain machine learning models in production reliably.
Monitoring machine learning models in production is one the most important things to do to ensure that a model will perform like expected. And for monitoring, we traditionally keep tracking performance metrics.
When we talk about model performance, we could divide it into two main categories, the first one is called functional that groups subjects about how well a model performs in the task that’s it was trained, usually measured in some metric defined by the data scientist who trained it. The other is called non-functional, which concerns machine learning operations. For the latter, a common task is to perform load testing in a deployed model, along with this test we will evaluate how well the model could perform in terms of response capacity in different levels of server load. In other words, a trained model needs to have a certain minimum of accuracy (functional characteristic), as well as has a low latency when it is called (non-functional characteristic).
In this post, we’ll train a simple model to predict a taxi price fare in new york city and perform load testing to evaluate its performance.
2. Model
In July 2018 Kaggle hosted a competition that aims to train a machine learning model to predict a Taxi Fare from New York city. We’ll use the dataset provided by this competition to train a simple model to perform our load testing. There are a lot of nice notebooks in the public leaderboard of this competition that we could use for our purpose. After I’ve analyzed several options available there and I’ve decided to use one shared by DJ Sterling.
This model will rely on the initial position of the customer (pickup position) as well as the destination of the trip (drop-off position).
2.1 Training the model
Now we’re going to present two functions that was used to train the linear model.
def get_input_matrix(df):
    """Stack our features into a numpy nd-array to train a model. """
    return np.column_stack(
        (df.abs_diff_longitude, df.abs_diff_latitude, np.ones(len(df)))
    )


def train_linear_model() -> None:
    """ A auxiliary function to train a model and serialize it """
    train_df = pd.read_csv(
        f'./data/{settings.get("dataset.nyc_fare_train_dataset", "train.csv.zip")}',
        nrows=10_000_000,
    )
    train_df = train_df.dropna(how="any", axis="rows")
    # exclude some datapoints outside an acceptable geographical range
    train_df = train_df.drop(
        train_df.loc[
            (train_df["pickup_longitude"] < -80) | (train_df["pickup_longitude"] > 50)
        ].index
    )
    train_df = train_df.drop(
        train_df.loc[
            (train_df["dropoff_longitude"] < -80) | (train_df["dropoff_latitude"] > 50)
        ].index
    )
    #create some features
    train_df["abs_diff_longitude"] = (
        train_df.dropoff_longitude - train_df.pickup_longitude
    ).abs()
    train_df["abs_diff_latitude"] = (
        train_df.dropoff_latitude - train_df.pickup_latitude
    ).abs()

    train_df = train_df[
        (train_df.abs_diff_longitude < 5.0) & (train_df.abs_diff_latitude < 5.0)
    ]

    train_X = get_input_matrix(train_df)
    train_y = np.array(train_df["fare_amount"])

    (w, _, _, _) = np.linalg.lstsq(train_X, train_y, rcond=None)
    #saving model weights to use on model prediction step
    with open("./artifacts/weights.pkl", "wb") as f:
        pickle.dump(w, f)
2.2 Expose our model
To access model predictions we’ll expose it through an endpoint and for that we created a simple server with fastapi.
# api.py
import uvicorn
from fastapi import FastAPI
import numpy as np
from artifacts import lmodel_weights # load model weights
from pydantic import BaseModel

app = FastAPI()

# pydantic model schema
class RideInfo(BaseModel):
    id: str
    pickup_datetime: str
    pickup_longitude: float
    pickup_latitude: float
    dropoff_longitude: float
    dropoff_latitude: float
    passenger_count: int


@app.post("/predict")
async def predict(ride_info: RideInfo):
    payload = ride_info.dict()
    abs_diff_longitude = abs(
        payload.get("pickup_longitude", 0) - payload.get("dropoff_longitude", 0)
    )
    abs_diff_latitude = abs(
        payload.get("pickup_latitude", 0) - payload.get("dropoff_latitude", 0)
    )
    data = np.array([abs_diff_longitude, abs_diff_latitude, 1])
    prediction = np.matmul(data, lmodel_weights).round(decimals=2)
    return {"price": prediction}


if __name__ == "__main__":
    uvicorn.run(app, host="0.0.0.0", port=8000)
3. Load testing
There are several frameworks to perform load testing available out there. For our experiment, we’ll use locust, which is an open-source tool built in python and very easy to use. Locust provides a rough idea of how many requests per second (RPS) our application can handle.
3.1 Fake Data
Our model is exposed through a post request and for that will be required to send a payload with the following fields: id, pickup_datetime, pickup_longitude, pickup_latitude, dropoff_longitude, dropoff_latitude and passenger_count.
We’ll use mimesis to generate fake data for us based on a schema that we’ve defined.
#gendata.py
from mimesis.schema import Field, Schema
import random

# arbiratry bounding box for NYC
# http://bboxfinder.com/#40.543026,-74.084930,40.949825,-73.561707

MAX_NYC_LATITUDE = 40.949825
MIN_NYC_LATITUDE = 40.543026
MAX_NYC_LONGITUDE = -73.561707
MIN_NYC_LONGITUDE = -74.084930

_ = Field("en")
# DATA SCHEMA
description = lambda: {
    "id": _("uuid"),
    "pickup_datetime": _(
        "datetime.formatted_datetime", fmt="%Y-%m-%d %H:%M:%S", start=2015
    ),
    "pickup_longitude": _(
        "numbers.float_number", start=MIN_NYC_LONGITUDE, end=MAX_NYC_LONGITUDE
    ),
    "pickup_latitude": _(
        "numbers.float_number", start=MIN_NYC_LATITUDE, end=MAX_NYC_LATITUDE
    ),
    "dropoff_longitude": _(
        "numbers.float_number", start=MIN_NYC_LONGITUDE, end=MAX_NYC_LONGITUDE
    ),
    "dropoff_latitude": _(
        "numbers.float_number", start=MIN_NYC_LATITUDE, end=MAX_NYC_LATITUDE
    ),
    "passenger_count": _(
        "numbers.float_number", start=MIN_NYC_LATITUDE, end=MAX_NYC_LATITUDE
    ),
    "passenger_count": _("numbers.integer_number", start=1, end=4),
}
schema = Schema(schema=description)


def gen_payload() -> dict:
    """
    A helper generator to produce valid data.
    """
    while True:
        yield schema.create(iterations=1)[0]


def gen_invalid_payload() -> dict:
    """
    A helper generator to produce invalid data (data with missing fields).
    """
    while True:
        payload = schema.create(iterations=1)[0]
        fields = list(payload.keys())
        field = random.choice(fields)
        del payload[field]
        yield payload
3.2 Locust Script
To prepare our load testing with locust we’ll need to prepare a script that has a class that inherits from HttpUser class from locust to configure our test.
# random.py
from locust import HttpUser, between, task
from data import gen_payload, gen_invalid_payload


class RandomizedTaxiUser(HttpUser):

    # wait between requests from one user for between 1 and 5 seconds.
    wait_time = between(0, 5)

    def __init__(self, *args, **kwargs):
        super().__init__(*args, **kwargs)
        self.payloads = gen_payload()
        self.invalid_payload = gen_invalid_payload()

    @task(5)
    def test_valid_payload(self):
        """
        This function will test a valid payload.
        """
        payload = next(self.payloads)
        self.client.post("/predict", json=payload)

    @task(1)
    def test_invalid_payload(self):
        """This function will test a invalid payload."""
        payload = next(self.invalid_payload)
        with self.client.post(
            "/predict", json=payload, catch_response=True
        ) as response:
            if response.status_code != 422:
                response.failure(
                    f"Wrong response. Expected status code 422, "
                    f"got {response.status_code}"
                )
            else:
                response.success()
In our RandomizedTaxiUser class, we’ve created two functions that will be tested under the test. Each one of them has a decorator (which assign that function to be a task for our test) and may receive a number that informs the fraction of requests that will be sent to each one of them. Thus, test_valid_payload will be receive 5 times more requests than test_invalid_payload.
3.3 Setup
First and foremost we’ll start our api and the locust server.
python api.py
locust -f ./tests/locust/random.py
3.4 Starting
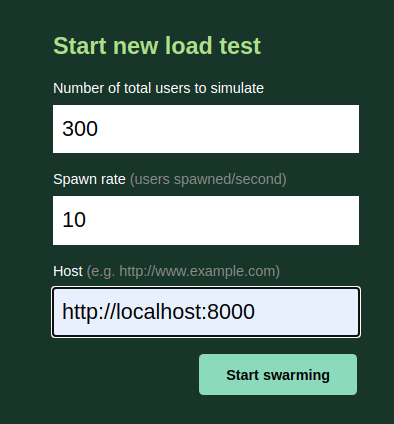
Locust has a nice user interface available through localhost:8089 where we’ll finish our setup.

Once we hit the start swarming button the test will initiated and it will possible to evaluate our run through several statistics available in the UI.

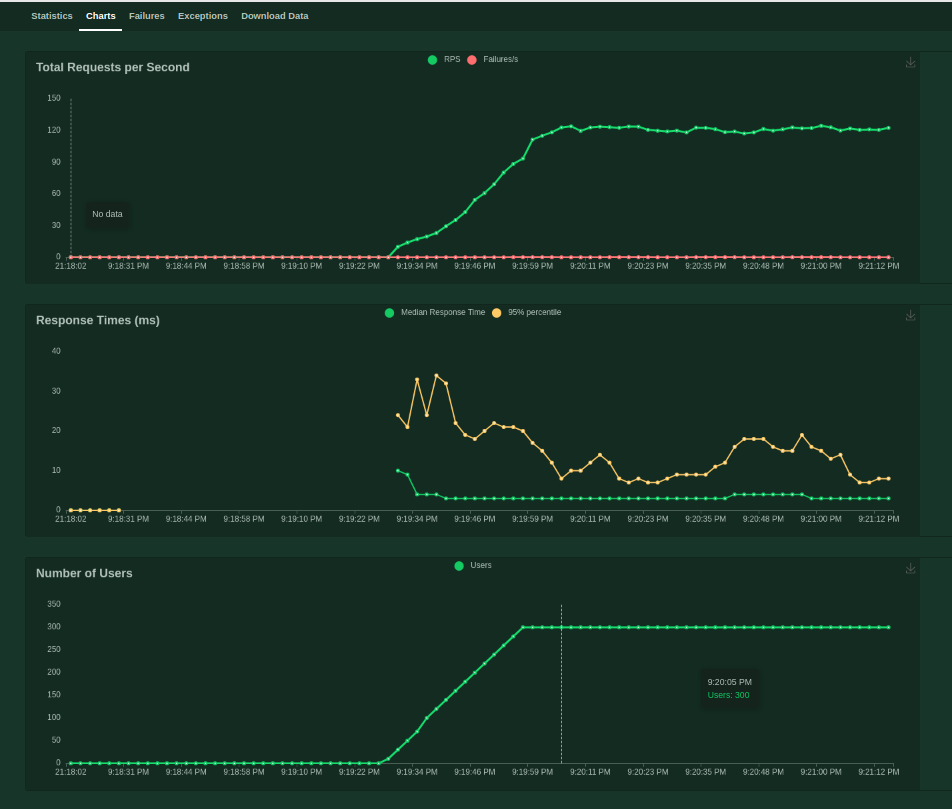
Along these stats locust provide to us some charts that are updated thorugh our test.

Along with these stats, locust provides some charts that are updated during our test.
With that, we present some resources to evaluate if the server that your model was deployed can handle the incoming load that your service requires.
For wrap up if you want to check out the code, you could access this repository.
