
A message Producer for Scrapy Pipeline
1. Introduction
Querido Diário is one of the most promising open-source projects that aim to contribute with government transparency and aim to integrate several government gazettes in a way that information could be machine-readable.
I’m following their work whenever possible but until today I couldn’t contribute to their project. However, days ago navigating through their Discord group I saw an issue about some interest for one of their project maintainers on possibles implementations of a queue system to process some files collected by their crawlers.
Querido Diário uses mainly scrapy to built their crawlers. Thus I have decided this was a good opportunity to perhaps contribute to the project. So the main purpose of this post is to build and presents one viable implementation of a Message Producer for use in scrapy pipelines.
2. Our tiny project
First of all, we’re going to present a hypothetical scenario where a message system could help a project of web scraping. Imagine a certain project where we’re going to scrape news from the site wired and their content is classified into several categories, like Business, Technology, Politics, and so on. In our scenario each one of these categories has some particularities in terms of business logic, and for the good sake of our code will be better to build different crawlers for each of these categories. For this toy project, we defined only a subset of categories only to see our pipeline working. So, they are Science, Business, Culture, and Security.
That’s said we’re going to build a “main spider” to navigate through the sitemap and collect information about the category of each of the listed URLs in the sitemap. We’ll create an Item to hold the data we want to collect in the URLs that spider will visit.
import scrapy
from itemloaders.processors import MapCompose, TakeFirst
from w3lib.html import remove_tags


class NewsItem(scrapy.Item):
    category = scrapy.Field(
        input_processor=MapCompose(remove_tags), output_processor=TakeFirst()
    )
    url = scrapy.Field(output_processor=TakeFirst())
The next step is our principal spider which will collect all URLs and their categories.
from scrapy.spiders import SitemapSpider
from scrapy.loader import ItemLoader
from wired.items import NewsItem
import logging


class WiredSpider(SitemapSpider):
    name = "newswired"
    sitemap_urls = ["https://www.wired.co.uk/sitemap.xml"]
    logger = logging.getLogger(name)
    logger.setLevel(logging.INFO)

    def parse(self, response):
        l = ItemLoader(item=NewsItem(), response=response)
        l.add_value(
            "category",
            response.xpath(
                "//main[@id='main-content']//a[contains(@href, '/topic/')]"
            ).get(),
        )
        l.add_value("url", response.url)
        return l.load_item()
2.1 Message Producer
There are plenty of resources and implementations available on the internet to build message producers. For this project, we combine characteristics of two producers proposed by the maintainers of the Pika client as well an implementation used by Rasa in its version 1.4.3. That’s said we can view our folder structure.
.
├── README.md
├── docker-compose.yml
├── poetry.lock
├── pyproject.toml
├── wired
    ├── scrapy.cfg
    └── wired
        ├── __init__.py
        ├── items.py
        ├── middlewares.py
        ├── pipelines.py
        ├── settings.py
        └── spiders
            ├── __init__.py
            └── wired_spider.py
Our work has resulted in a class called PikaProducer which lives in pipelines.py file. For the fellows who want to look at the complete code, you would find it here. Thus, we’re going to highlight only some parts of the logic behind this producer. In the settings.py we defined some configuration variables used on the initialization of the PikaProducer. In those variables, we defined that we’re going to create an exchange called news_subject of category direct as well we establish the names for our queues and routing keys.
RABBITMQ_HOST = "localhost"
RABBITMQ_PORT = 5672
RABBITMQ_USERNAME = "guest"
RABBITMQ_PASSWORD = "guest"
RABBITMQ_EXCHANGE = "news_subject"
RABBITMQ_EXCHANGE_TYPE = ExchangeType.direct
RABBITMQ_QUEUES = ["Science", "Business", "Culture", "Security"]
RABBITMQ_ROUTING_KEYS = ["science", "business", "culture", "security"]
For the PikaProducer to access those variables we have defined a class method from_crawler that enables that class to access data from settings.py.
# that chunck of code belongs to PikaProducer class
@classmethod
def from_crawler(cls, crawler):
    return cls(
        host=crawler.settings.get("RABBITMQ_HOST"),
        port=crawler.settings.get("RABBITMQ_PORT"),
        username=crawler.settings.get("RABBITMQ_USERNAME"),
        password=crawler.settings.get("RABBITMQ_PASSWORD"),
        exchange=crawler.settings.get("RABBITMQ_EXCHANGE"),
        exchange_type=crawler.settings.get("RABBITMQ_EXCHANGE_TYPE"),
        queues_names=crawler.settings.get("RABBITMQ_QUEUES"),
        routing_keys=crawler.settings.get("RABBITMQ_ROUTING_KEYS"),
    )
That way when this class is instantiate will be possible to access our configurations defined in settings.py.
# that chunck of code belongs to PikaProducer class
class PikaProducer:
    def __init__(self, host, port, username, password, exchange, exchange_type, queues_names, routing_keys,):
        """RabbitMQ event producer."""
        self.host = host
        self.port = port
        self.username = username
        self.password = password
        self.EXCHANGE = exchange
        self.EXCHANGE_TYPE = exchange_type
        self.QUEUES = queues_names
        self.ROUTING_KEYS = routing_keys
        self._connection = None
        self._channel = None
        self._deliveries = []
        self._acked = 0
        self._nacked = 0
        self._message_number = 0
        self._stopping = False
Scrapy offers helper methods that enable us to control some action that will be triggered at the start and the end of a web scraping. So we used those to initialize and properly closes our producer.
# that chunck of code belongs to PikaProducer class
def open_spider(self, spider):
    try:
        self._run_pika()
    except:
        print(f"Something has wrong on trying to connect to RabbitMQ service.")
        sys.exit(1)

def close_spider(self, spider):
    self.stop()
The following methods are responsible to create/declare our exchange and bind our queues with the exchange and their respectively routing keys.
# that chunck of code belongs to PikaProducer class
def setup_exchange(self, exchange_name):
    """Setup the exchange on RabbitMQ by invoking the Exchange.Declare RPC
    command. When it is complete, the on_exchange_declareok method will
    be invoked by pika.
    :param str|unicode exchange_name: The name of the exchange to declare
    """
    LOGGER.info("Declaring exchange %s", exchange_name)
    # Note: using functools.partial is not required, it is demonstrating
    # how arbitrary data can be passed to the callback when it is called
    cb = functools.partial(self.on_exchange_declareok, userdata=exchange_name)
    self._channel.exchange_declare(
        exchange=exchange_name, exchange_type=self.EXCHANGE_TYPE, callback=cb
    )

def on_exchange_declareok(self, unused_frame, userdata):
    """Invoked by pika when RabbitMQ has finished the Exchange.Declare RPC
    command.
    :param pika.Frame.Method unused_frame: Exchange.DeclareOk response frame
    """
    LOGGER.info(f"Exchange declared {userdata}.")
    for queue_name in self.QUEUES:
        self.setup_queue(queue_name)

def setup_queue(self, queue_name):
    """Setup the queue on RabbitMQ by invoking the Queue.Declare RPC
    command. When it is complete, the on_queue_declareok method will
    be invoked by pika.
    :param str|unicode queue_name: The name of the queue to declare.
    """
    LOGGER.info("Declaring queue %s", queue_name)
    self._channel.queue_declare(queue=queue_name, callback=self.on_queue_declareok)

def on_queue_declareok(self, _unused_frame):
    """Method invoked by pika when the Queue.Declare RPC call made in
    setup_queue has completed. In this method we will bind the queue
    and exchange together with the routing key by issuing the Queue.Bind
    RPC command. When this command is complete, the on_bindok method will
    be invoked by pika.
    :param pika.frame.Method method_frame: The Queue.DeclareOk frame
    """
    for queue_name, routing_key in zip(self.QUEUES, self.ROUTING_KEYS):
        LOGGER.info(
            "Binding %s to %s with %s", self.EXCHANGE, queue_name, routing_key
        )
        self._channel.queue_bind(
            queue_name,
            self.EXCHANGE,
            routing_key=routing_key,
            callback=self.on_bindok,
        )
Move on in the partial analysis of PikaProducer, we select to present the method responsible for sending messages to our previously defined exchange.
# that chunck of code belongs to PikaProducer class

def publish_message(self, message, routing_key):
    """If the class is not stopping, publish a message to RabbitMQ,
    appending a list of deliveries with the message number that was sent.
    This list will be used to check for delivery confirmations in the
    on_delivery_confirmations method.
    """
    if self._channel is None or not self._channel.is_open:
        return

    properties = pika.BasicProperties(
        app_id="wired-crawler", content_type="application/json"
    )

    self._channel.basic_publish(
        self.EXCHANGE,
        routing_key,
        json.dumps(message, ensure_ascii=False),
        properties,
    )
    self._message_number += 1
    self._deliveries.append(self._message_number)
    LOGGER.info("Published message # %i", self._message_number)
The last piece that we decided to show about PikaProducer is the process_item method which wheres resides the logic inside scrapy to manipulate the items collected during the scraping. I have decided to drop all items that for some reason do not have a category assigned or if there is one that not belongs to our defined scope. That way our producer will send a message to the exchange which in turn will forward the message for the queue determined by the routing key assigned in publish message method.
# that chunck of code belongs to PikaProducer class
def process_item(self, item, spider):
    category = item.get("category")
    if not category:
        raise DropItem("We cannot identify which category this article belongs.")
    category = category.lower()
    if category not in self.ROUTING_KEYS:
        raise DropItem(f"The category {category} is not include in our project.")
    self.publish_message(message={"url": item.get("url")}, routing_key=category)
Thereby we’ve finished our tour on our implementation of a message producer. The next step is to activate that pipeline. For this purpose, we just add the following code to settings.py.
ITEM_PIPELINES = {
    "wired.pipelines.PikaProducer": 200,
}
Before we run our WiredSpider to test our pipeline, we’re going to set up an instance of RabbitMQ. The code below contains the instruction to do that with a docker container.
#this code belongs to the file docker-compose.yml
rabbitmq:
    image: rabbitmq:3-management-alpine
    hostname: my-rabbit
    volumes:
        - ./rabbitmq/etc/definitions.json:/etc/rabbitmq/definitions.json
        - ./rabbitmq/data:/var/lib/rabbitmq/mnesia/rabbit@my-rabbit
        - ./rabbitmq/logs:/var/log/rabbitmq/log
    ports:
        - 5672:5672
        - 15672:15672
To start the RabbiMQ instance we can use: docker-compose up -d rabbitmq. With all set we can navigate to ./wired folder and call the command:
scrapy crawl newswired
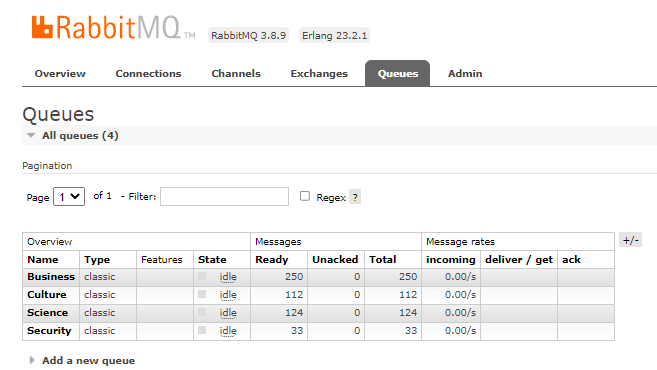
As our goal is only test our pipeline in action. Thus we’ve configured our spider to closes when it reached 500 items collected (CLOSESPIDER_ITEMCOUNT=500). So, after the run finished we can access http://localhost:15672/#/queues thourgh the browser and and will appear the numbers of messages received by each queue.
Thus we’ve tested our message producer connected to a scrapy pipeline. Thus, in a near future we could bring to this blog perhaps one message consumer for this toy project. What do you think? I hope you have enjoyed this blog post. See you next time! 🤓